Scheduled Upgrades in Thalassa Cloud Kubernetes
Keeping your Kubernetes clusters up-to-date is essential for security, performance, and access to new features. However, managing upgrades manually can be time-consuming and risky, especially when running multiple clusters. Thalassa Cloud’s scheduled upgrades feature automates the upgrade process, allowing you to keep clusters current while controlling when updates are applied.
This guide explains how scheduled upgrades work in Thalassa Cloud, how to configure maintenance windows, and how to ensure upgrades happen smoothly without disrupting your workloads.
About Scheduled Upgrades
Scheduled upgrades in Thalassa Cloud keep your Kubernetes clusters up to date automatically. Instead of upgrading manually, you just set your preferred maintenance window and upgrade strategy, and the platform takes care of the rest.
When a new Kubernetes version that meets your upgrade settings is available, Thalassa Cloud will schedule your cluster to upgrade during your chosen maintenance window. This keeps your clusters current with minimal effort. Both the control plane and node pools are upgraded. The control plane is updated first. If auto-upgrades for node pools are enabled, your nodes will also update automatically to match the control plane, keeping your cluster in sync.
Maintenance Windows
Maintenance windows let you decide when cluster upgrades are allowed, so you can avoid disruptions during busy times.
A maintenance window has three main settings:
- Day of the week: When upgrades can happen (for example, Sunday)
- Start time: The time upgrades are allowed to begin (such as 2:00 AM UTC)
- Duration: How long the window is open (usually 2–4 hours)
Example:
If your applications have low traffic on Sunday mornings, set the window for Sunday at 2:00 AM UTC. The platform will only perform upgrades during this time.
During a maintenance window:
- The control plane might be briefly unavailable
- Node pools are upgraded with rolling updates
- Applications with multiple replicas and good health checks usually keep serving traffic without interruption
Upgrade Strategies
Upgrade strategies determine which Kubernetes versions the platform considers for automatic upgrades. Different strategies provide different balances between staying current and maintaining stability.
- The None strategy disables automatic upgrades entirely. With this strategy, you maintain complete manual control over when and how clusters are upgraded. This is useful if you have strict change control processes or need to coordinate upgrades with application deployments. However, it requires you to monitor for new versions and trigger upgrades manually.
- The Stable strategy automatically upgrades to stable releases only. This is the recommended strategy for production environments, as it ensures you receive security patches and bug fixes while avoiding pre-release or experimental versions. Stable releases have been tested and are suitable for production use.
- The Latest strategy automatically upgrades to the latest available version, which may include pre-release versions or very recent releases that haven’t been widely tested yet. This strategy is useful for development or testing clusters where you want early access to new features, but it’s generally not recommended for production due to the potential for instability.
Choose your upgrade strategy based on your environment and risk tolerance. Production clusters typically use Stable, while development clusters might use Latest to test new features early. You can configure different strategies for different clusters based on their purpose.
Configuring Scheduled Upgrades
Setting up scheduled upgrades involves configuring maintenance windows and selecting an upgrade strategy. You can do this through the Thalassa Cloud Console, which provides a straightforward interface for managing these settings.
Navigate to your Kubernetes cluster in the Thalassa Cloud Console and select the Maintenance tab. Here you’ll see your current maintenance configuration and options to modify it.
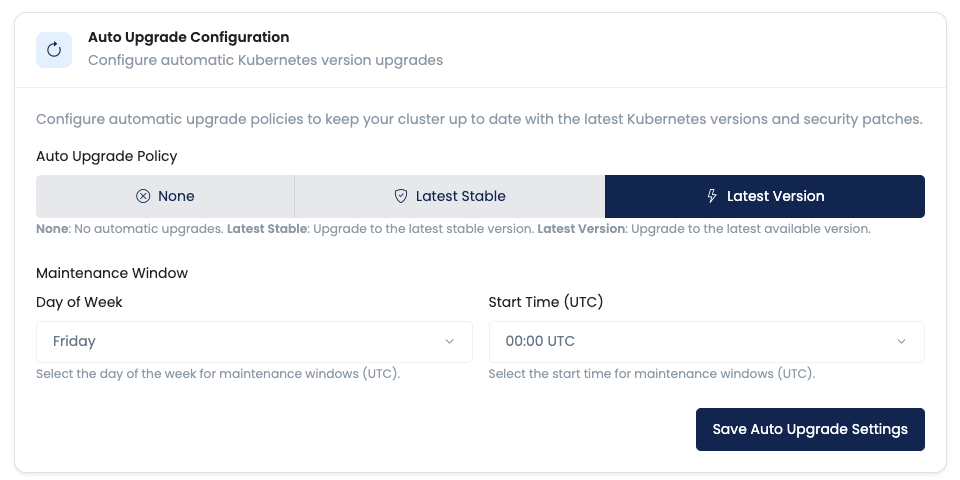
Configure maintenance windows and upgrade strategies
First, select your upgrade strategy. Choose None if you want manual control, Stable for production clusters, or Latest for development clusters that can tolerate more risk. Consider your cluster’s purpose and your organisation’s change management requirements when making this choice.
Next, configure your maintenance window. Select the day of the week when maintenance can occur. Common choices include weekends or days when your applications experience lower traffic. Then specify the time when maintenance can start, using UTC time. Choose a time that aligns with low-traffic periods in your primary timezone.
The platform uses these settings to schedule upgrades automatically. When a new Kubernetes version becomes available that matches your upgrade strategy, the platform schedules an upgrade for the next available maintenance window. You’ll receive notifications before the upgrade begins, giving you visibility into upcoming changes.
The Upgrade Process
Understanding what happens during an upgrade helps you prepare and ensures smooth transitions. The upgrade process is designed to minimize disruption, but knowing the sequence of events helps you plan accordingly.
- The upgrade begins during your configured maintenance window. The platform first upgrades the control plane, which includes the API server, etcd, controller manager, and scheduler. The control plane upgrade typically takes 15 to 30 minutes, during which the API server may be briefly unavailable.
- During the control plane upgrade, your applications continue running on existing nodes. The API server downtime is usually brief—just long enough to restart components with the new version. Well-designed applications that can handle brief API unavailability continue operating normally.
- After the control plane upgrade completes, node pool upgrades begin if you’ve enabled auto-upgrades. Node pools are upgraded using a rolling update strategy, where nodes are updated one or a few at a time. As each node is updated, pods are evicted and rescheduled onto other nodes, then the updated node rejoins the cluster.
- The rolling update process ensures that your applications maintain capacity throughout the upgrade. As long as you have multiple replicas of your applications and sufficient node capacity, traffic continues to be served even as individual nodes are updated. The process continues until all nodes in the pool are running the new Kubernetes version.
Monitoring Upgrades
The Thalassa Cloud Console provides visibility into scheduled and in-progress upgrades. You can view upcoming maintenance events, see the current status of ongoing upgrades, and review historical upgrade logs.
View all maintenance windows and their configurations
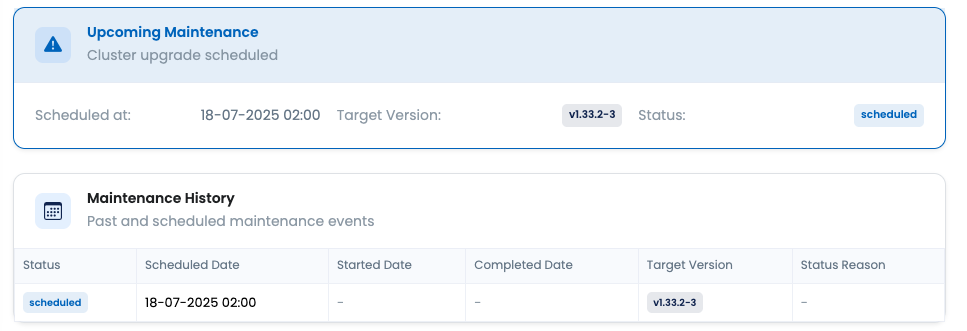
The maintenance list shows all scheduled maintenance events, including their scheduled times, target versions, and current status. This helps you plan around upgrades and understand when changes will occur.
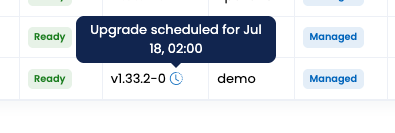
View scheduled maintenance events and their details
When an upgrade is scheduled, you’ll see details about the target version and when the upgrade will begin. This information helps you prepare applications and coordinate with your team. You can also see the current status of in-progress upgrades, including which components have been updated and which are still pending.
After an upgrade completes, you can review the upgrade history to see when upgrades occurred, what versions were involved, and whether any issues were encountered. This historical information helps you understand upgrade patterns and identify any recurring issues.
Notifications
Thalassa Cloud provides notifications for scheduled maintenance events, keeping you informed about upcoming upgrades and their status. These notifications help you stay aware of changes and prepare your applications accordingly.
Email Notifications
You’ll get email notifications at key steps during upgrades. When maintenance is scheduled, you’ll be told the date and version in advance. You’ll get another email when the upgrade starts, and one when it finishes with the new version. If something goes wrong, you’ll get a notification with details so you can take action quickly.
Console Notifications
The Thalassa Cloud Console also displays maintenance information in real-time. The cluster overview shows upcoming maintenance events, so you can see at a glance when upgrades are scheduled. During an upgrade, the console shows the current status, including which components are being updated.
The console also maintains historical maintenance logs, allowing you to review past upgrades and understand upgrade patterns over time. This historical information is useful for planning and troubleshooting.
Troubleshooting Upgrade Issues
Occasionally, upgrades may encounter issues. Understanding common problems and how to resolve them helps you maintain cluster health and ensure upgrades complete successfully.
Upgrade Failures
If an upgrade fails, first check that all your nodes are healthy and ready. Make sure your cluster has enough free resources for the upgrade to finish.
Look at the logs or error messages in the Thalassa Cloud Console or email notifications to find out what went wrong. Common problems are not enough resources, configuration issues, or network problems.
Usually, the platform will roll back to the previous version automatically. Fix any issues before trying again.
Node Pool Issues
If you run into problems upgrading node pools, try the following:
- Make sure your node pool settings are compatible with the new Kubernetes version. Some options may not work with newer versions.
- Review any customizations (like kubelet configs or container runtime settings) and update them for the new version if needed.
- If specific nodes won’t upgrade, try draining and replacing them.
- Thalassa Cloud’s auto-healing may also automatically replace stuck or failed nodes.
Application Disruptions
To avoid application disruptions during upgrades:
- Design apps for rolling updates (multiple replicas, standard Kubernetes features).
- Always set up health checks and readiness probes—these help keep traffic away from unready pods during upgrades.
- Use at least two replicas for critical apps so one can handle traffic when another is restarting.
- Check your pod disruption budgets:
- If they’re too strict, upgrades may stall.
- Ensure budgets allow needed pods to be evicted during rolling updates.
Manual Upgrades
Manual upgrades let you decide exactly when to update your cluster. To use manual upgrades, set the upgrade strategy to None—this turns off automatic updates.
Watch for new Kubernetes versions in the Thalassa Cloud Console or see the release notes. Always test upgrades in a staging environment before updating production clusters.
To start an upgrade, use the Console or run tcloud kubernetes upgrade in the CLI.
Manual upgrades give you full control but require more effort. Scheduled upgrades handle the process for you, but use manual upgrades if you need strict control over when changes happen.
Version Compatibility
Before upgrading, make sure your apps and configurations work with the new Kubernetes version. Some features or APIs might be removed or changed, so always check the Kubernetes and Thalassa Cloud release notes.
- Check your apps and any custom controllers or operators (like cert-manager or ingress controller) for compatibility.
- Make sure your storage classes, persistent volumes, and network policies will still work after the upgrade.
- Test upgrades in staging before updating production.
See the official Kubernetes release notes and Thalassa Cloud Kubernetes release notes for details on changes and compatibility.
Further Reading
- Kubernetes Release Notes — Details about supported Kubernetes versions, changes, and major features.
- Nodes Documentation — Learn how to manage clusters and node pools.
- Kubernetes Official Release Notes — Reference for upstream Kubernetes version changes.
- Cluster Maintenance Guide — Tips for scheduling maintenance and minimizing disruption.
- Pod Disruption Budgets — Best practices for ensuring high availability during upgrades.